
symfonyのインストールする方法ってどうやるのかな?
設定方法も分からないや。
そうだ!ふくろう先生に聞いてみよう。
ふくろう先生。こんにちは。
symfonyをインストールする方法ってどうやればいいですか?
設定方法も分からないので教えて下さい。
ナマケモノ君。こんにちは!
今回は、symfonyをインストール方法と環境設定だね。
わかったよ。
次の手順に従っていけば、出来るよ。
今回の最終目標
- symfonyのインストールを完了させて標準的な設定を行います。
用意するもの
- CentOS7がインストールされているPC(Server)を1台。
概要
- symfonyをインストールします。
- インストールしたsymfonyの初期設定を行います。
作業手順
CentOSのインストールが、まだの方はこちらを参照して下さい。
step.1
まず、スーパーユーザーに変更します。
su –

step.2
パスワードを聞いてくるのでスーパーユーザーのパスワードを入力してね。

step.3
最初にRemiに必要なEPELのインストールします。

step.4
次にRemiレポジトリの構成パッケージをインストールしてね。

step.5
yum-utilsパッケージをインストールするよ

step.6
PHP8.1のパッケージのみ有効にするための処理をするよ。
PHP8.1以外を使えないようにするよ。

step.7
PHP8.1のパッケージのみ有効にするための処理をするよ。

step.8
念のためアップデートをしてね。

step.9
PHP関係のツールをインストールするよ。

step.10
PHPが8.1になっているか確認するよ。

step.11
composerをインストールするのでディレクトリを変えるよ。

step.12
composerのダウンロードだよ。

step.13
ダウンロードしたのでインストールしてね。

step.14
インストーラーが要らなくなったので削除してね。

step.15
インストールされたcomposerを移動するよ。

step.16
さっ ここからがsymfonyにインストール開始だよ。
まず、composerを使ってコマンド実行!

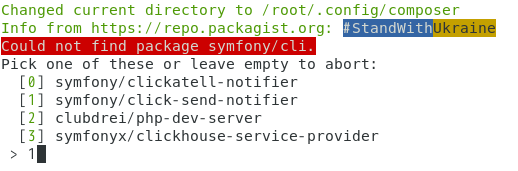
step.17
メニュー画面でどれか選択してと聞いてくるので
今回は『1』を選択するよ。
step.18
プロジェクトを作成して動作確認するよ。
まず、プロジェクトの作成。

step.19
出来上がったプロジェクトに移動!

step.20
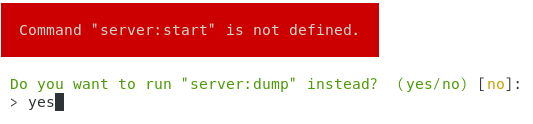
サーバーをスタートするよ。

step.21
あららっ エラーが出たので対応しなくちゃね。

step.22
エラー対策のコマンド実行。

step.23
メニューで「Yes」「No」を聞いてきたので、今回は「Yes」で対応!
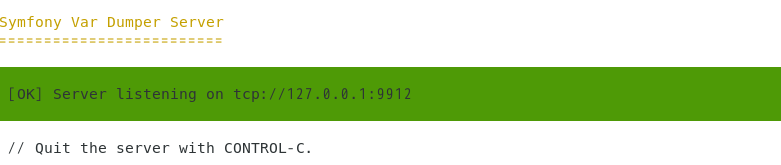
step.24
下記の画面が表示されたね。
これでsymfonyのインストールは完了。
でも今は、symfony単体で使用するよりもLaravelを使用する方がポピュラーかもね。
ちなみにLaravelのインストール方法は下記のボタンをおしてね。
Complete!!
お疲れ様でした。
これで晴れてsymfonyのインストール及び環境設定は完了です。
ナマケモノ君。出来たかな?
はい!。出来ました。
ふくろう先生、ありがとうございました。
コーポレートサイトhttps://www.rin-tech.netを開設しました。
どうぞ、よろしくお願いいたします。


コメント