PostgreSQLのインストールする方法ってどうやるのかな?
設定方法も分からないや。
そうだ!ふくろう先生に聞いてみよう。
ふくろう先生。こんにちは。
PostgreSQLをインストールする方法ってどうやればいいですか?
設定方法も分からないので教えて下さい。
ナマケモノ君。こんにちは!
今回は、PostgreSQLをインストール方法と環境設定だね。
わかったよ。
次の手順に従っていけば、出来るよ。
今回の最終目標
- PostgreSQLのインストールを完了させて標準的な設定を行います。
用意するもの
- CentOS7 がインストールされているPC(Server)を1台。
概要
- PostgreSQLをインストールします。
- インストールしたPostgreSQLの初期設定を行います。
作業手順
CentOSのバージョン7のインストールが、まだの方はこちらを参照して下さい。
step.1
まず、スーパーユーザーに変更します。
su –

step.2
パスワードを聞いてくるのでスーパーユーザーのパスワードを入力してね。

step.3
リポジトリパッケージをインストールするよ。
yum -y install https://download.postgresql.org/pub/repos/yum/reporpms/EL-7-x86_64/pgdg-redhat-repo-latest.noarch.rpm

step.4
リポジトリパッケージをインストールが完了すると、下記の画面のようになるよ。

step.5
次にPostgreSQLをインストールするよ。
今回は、バージョン13です。
yum -y install postgresql13-server

step.6
インストールが上手くいくと、下記と同じようなメッセージが表示されるよ。

step.7
毎回手動で起動するのは面倒なので、サービスの自動起動を設定するよ。
systemctl enable postgresql-13

step.8
次は、データベースクラスタを作成するよ。
/usr/pgsql-13/bin/postgresql-13-setup initdb

step.9
データベースクラスタが完了すると、下記と同じようなメッセージが表示されるよ。

step.10
PostgreSQL13の起動して確認作業に移るよ。
systemctl start postgresql-13

step.11
サービス状態の確認作業のコマンドを入力してね。
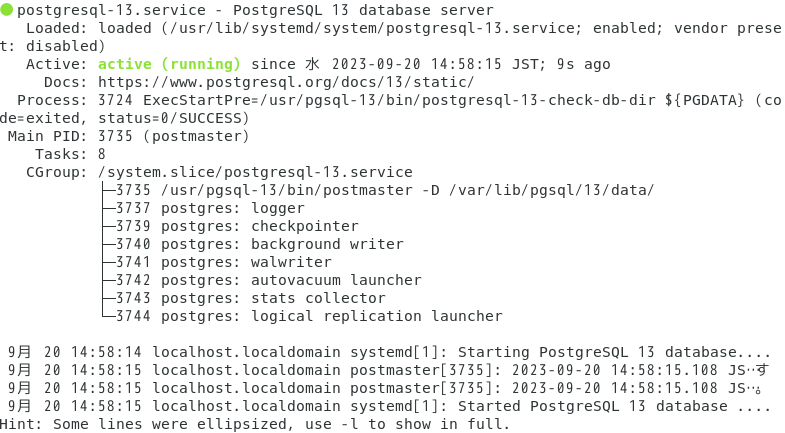
systemctl status postgresql-13

step.12
下記と同じようなメッセージが表示されるよ。
step.13
最後にデータベースの一覧の確認作業だよ。まず、「postgres」ユーザーでログインしてね。
su – postgres

step.14
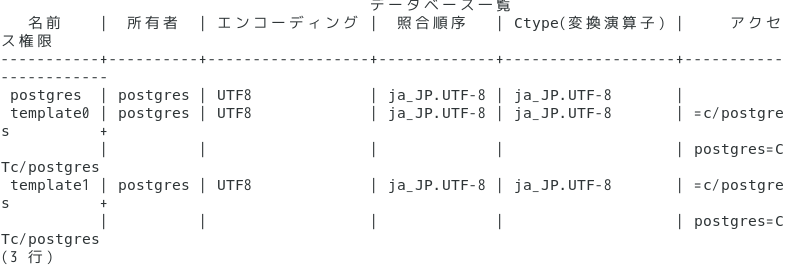
「postgres」ユーザーでログインしたら、使用可能なデータベース一覧を表示するよ。
psql -l

step.15
下記と同じような画面が表示されるかな。
step.16
さっ、psqlは「exit」で終了してね。
exit

step.17
下記画面のようになれば終了です。

Complete!!
お疲れ様でした。
これで晴れてPostgreSQLのインストール及び環境設定は完了です。
ナマケモノ君。出来たかな?
はい!。出来ました。
ふくろう先生、ありがとうございました。
コーポレートサイトhttps://www.rin-tech.netを開設しました。
どうぞ、よろしくお願いいたします。

コメント