![ナマケモノ君](https://rin-tech.blog/wp-content/uploads/2023/08/ナマケモノ-はてな.png)
OpenSSHのインストールする方法ってどうやるのかな?
設定方法も分からないや。
そうだ!ふくろう先生に聞いてみよう。
![ナマケモノ君](https://rin-tech.blog/wp-content/uploads/2023/08/ナマケモノ-はてな.png)
ふくろう先生。こんにちは。
OpenSSHをインストールする方法ってどうやればいいですか?
設定方法も分からないので教えて下さい。
![ふくろう先生](https://rin-tech.blog/wp-content/uploads/2023/08/ふくろう先生.png)
ナマケモノ君。こんにちは!
今回は、OpenSSHをインストール方法と環境設定だね。
わかったよ。
次の手順に従っていけば、出来るよ。
![ふくろう先生](https://rin-tech.blog/wp-content/uploads/2023/08/ふくろう先生.png)
ちなみにSSHとは、
UNIX系OSのシェルをネットワークを通じて離れたコンピュータから操作できるようにするソフトウェアおよび通信規約(プロトコル)で、認証を含めた通信の全体を暗号化する仕組みを持ち、遠隔間で安全に操作を行うことができる。
https://e-words.jp/w/OpenSSH.html
今回の最終目標
- OpenSSHのインストールを完了させて標準的な設定を行います。
用意するもの
- CentOS7 がインストールされているPC(Server)を1台。
概要
- OpenSSHをインストールします。
- インストールしたOpenSSHの初期設定を行います。
作業手順
CentOSのインストールが、まだの方はこちらを参照して下さい。
![ふくろう先生](https://rin-tech.blog/wp-content/uploads/2023/08/ふくろう先生.png)
step.1
まず、スーパーユーザーにしてね。
su –
![スーパーユーザー](https://rin-tech.blog/wp-content/uploads/2023/09/01.スーパーユーザー-6.png)
![ふくろう先生](https://rin-tech.blog/wp-content/uploads/2023/08/ふくろう先生.png)
step.2
スーパーユーザーのパスワードを聞いてくるのでパスワードを入力。
![パスワード](https://rin-tech.blog/wp-content/uploads/2023/09/02.パスワード-4.png)
![ふくろう先生](https://rin-tech.blog/wp-content/uploads/2023/08/ふくろう先生.png)
step.3
念のため、rmで削除するよ。
rm /var/run/yum.pid
![rm](https://rin-tech.blog/wp-content/uploads/2023/09/03.rm_.png)
![ふくろう先生](https://rin-tech.blog/wp-content/uploads/2023/08/ふくろう先生.png)
step.4
updateしてね。
yum update
![update](https://rin-tech.blog/wp-content/uploads/2023/09/04.update.png)
![ふくろう先生](https://rin-tech.blog/wp-content/uploads/2023/08/ふくろう先生.png)
step.5
さっ、openssh-serverをインストールするよ。
yum install -y openssh-server
![openssh-server install](https://rin-tech.blog/wp-content/uploads/2023/09/05.openssh-server-install.png)
![ふくろう先生](https://rin-tech.blog/wp-content/uploads/2023/08/ふくろう先生.png)
step.6
sshdを許可するコマンドを押下するよ。
systemctl enable sshd
![enable sshd](https://rin-tech.blog/wp-content/uploads/2023/09/06.enable-sshd.png)
![ふくろう先生](https://rin-tech.blog/wp-content/uploads/2023/08/ふくろう先生.png)
step.7
許可したのでsshdを再起動してね。
systemctl restart sshd
![restart sshd](https://rin-tech.blog/wp-content/uploads/2023/09/07.restart-sshd.png)
![ふくろう先生](https://rin-tech.blog/wp-content/uploads/2023/08/ふくろう先生.png)
step.8
ファイヤーウォールの設定をするよ。
firewall-cmd –add-service=ssh –permanent
![firewall ssh](https://rin-tech.blog/wp-content/uploads/2023/09/08.firewall-ssh.png)
![ふくろう先生](https://rin-tech.blog/wp-content/uploads/2023/08/ふくろう先生.png)
step.9
ファイヤーウォールを再起動してね。
firewall-cmd –reload
![forewall reload](https://rin-tech.blog/wp-content/uploads/2023/09/09.forewall-reload.png)
![ふくろう先生](https://rin-tech.blog/wp-content/uploads/2023/08/ふくろう先生.png)
step.10
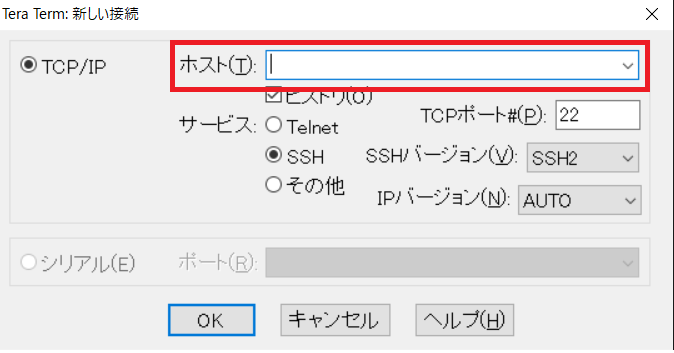
Tera Termなどのツールを使用して接続して確認してね。
ホスト欄にOpenSSHを導入したサーバーのIPアドレスやホスト名を入力して
『OKボタン』を押下するんだよ。
![TeraTerm](https://rin-tech.blog/wp-content/uploads/2023/09/10.TeraTerm.png)
Complete!!
![ふくろう先生](https://rin-tech.blog/wp-content/uploads/2023/08/ふくろう先生.png)
お疲れ様でした。
これで晴れてOpenSSHのインストール及び環境設定は完了です。
ナマケモノ君。出来たかな?
![ナマケモノ君](https://rin-tech.blog/wp-content/uploads/2023/08/ナマケモノ-喜ぶ.png)
はい!。出来ました。
ふくろう先生、ありがとうございました。
コメント