
ナマケモノ君
Laravelのインストールする方法ってどうやるのかな?
設定方法も分からないや。
そうだ!ふくろう先生に聞いてみよう。
ナマケモノ君
ふくろう先生。こんにちは。
Laravelをインストールする方法ってどうやればいいですか?
設定方法も分からないので教えて下さい。
ふくろう先生
ナマケモノ君。こんにちは!
今回は、Laravelをインストール方法と環境設定だね。
わかったよ。
次の手順に従っていけば、出来るよ。
今回の最終目標
- Laravelのインストールを行います。
用意するもの
- CentOS 、php、composerがインストールされているPC(Server)を1台。
概要
- Laravelをインストールします。
作業手順
CentOSのインストールが、まだの方はこちらを参照して下さい。
php,composerのインストールが、まだの方はこちらを参照して下さい。
ふくろう先生
step.1
まず、スーパーユーザーに変更します。
su –

ふくろう先生
step.2
composerを使用してインストールします。
composer create-project laravel/laravel –prefer-dist laravel-7.x “7.x”

ふくろう先生
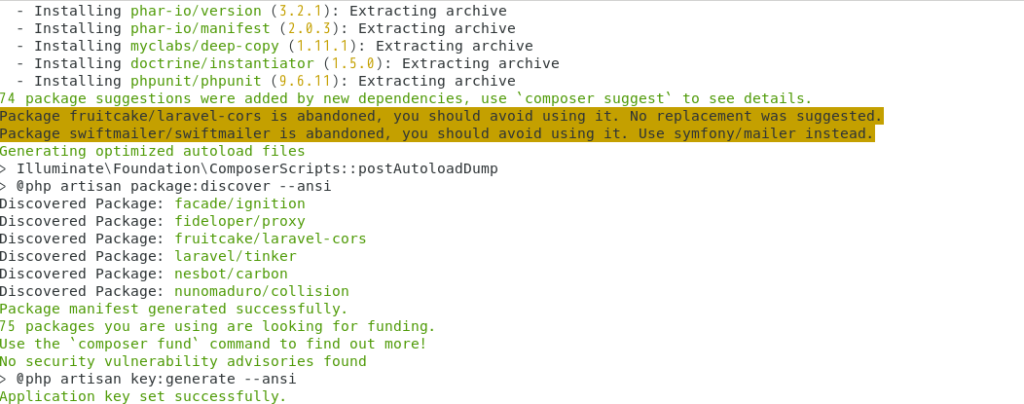
step.3
インストールが完了すると下記のメッセージが表示されるよ。
ふくろう先生
step.4
最後にバージョンを確認して終了です。

Complete!!
ふくろう先生
お疲れ様でした。
これで晴れてLaravelのインストール及び環境設定は完了です。
ナマケモノ君。出来たかな?
ナマケモノ君
はい!。出来ました。
ふくろう先生、ありがとうございました。
コーポレートサイトhttps://www.rin-tech.netを開設しました。
どうぞ、よろしくお願いいたします。

コメント