MySQLをデータベースサーバーにしてExmentを使えるようにしたいけど、
どうやるのかな?
設定方法も分からないや。
そうだ!ふくろう先生に聞いてみよう。
ふくろう先生。こんにちは。
MySQLをデータベースサーバーにしてExmentを使えるようしたです。
Exmentのインストールする方法ってどうやればいいですか?
設定方法も分からないので教えて下さい。
ナマケモノ君。こんにちは!
今回は、Exmentのインストール方法と環境設定だね。
前提条件として、MySQLをデータベースサーバーとして使うんだね。
わかったよ。
次の手順に従っていけば、出来るよ。
今回Exmentを使用したシステム構築に興味を持たれた方や
システム構築は無理かもしれないがExmentを使ってみたい方は
一度、下記サイトも覗いてみて下さい。
お問い合わせもお待ちしております。
また、Exmentの機能をもう少し知りたい方は、ここが凄いぞ!Exmentというシリーズも始めましたので、一度訪れてみて下さい。
多くの企業で必要と思われる情報共有ツールWorkWave.を作成しました。
WorkWave.とは、『仕事の波を乗りこなせ!』という意味を込めて命名しました。
どうぞ、よろしくお願いいたします。
多くの企業で必要と思われる運送会社で使用するツールDriveShield.を作成しました。
DriveShield.とは、『ドライバーさんを守る!』という意味を込めて命名しました。
どうぞ、よろしくお願いいたします。
今回の最終目標
- Exmentのインストールを完了させて標準的な設定を行います。
用意するもの
- CentOS7 、Apache、PHP、composer、MySQLがインストールされているPC(Server)を1台。
概要
- MySQLにExmentで使用するデータベースを作成します。
- Exmentをダウンロードします。
- Exmentをインストールします。
- Exment の初期設定を行います。
作業手順
CentOSのインストールが、まだの方はこちらを参照して下さい。![]()
Apacheのインストールが、まだの方はこちらを参照して下さい。![]()
PHPとcomposerのインストールが、まだの方はこちらを参照して下さい。![]()
MySQLのインストールが、まだの方はこちらを参照して下さい。![]()
step.1
Exment用のデータベースとユーザーの作成するために、MySQLサーバーにログインしてます。
mysql -u root -p

step.2
MySQLのインストールした時に設定した
パスワードを入力して『enter』キーを押下して下さい。

step.3
『CREATE DATABASE exment_database;』を入力して『enter』キーを押下して下さい。

step.4
『CREATE USER ‘exment_user’@’192.168.0.%’ IDENTIFIED BY ‘exment_pass’;』を入力して『enter』キーを押下して下さい。
※@以下の192.168.0.%は、自社の環境に合せて下さい。

step.5
『GRANT ALL ON exment_database.* TO exment_user identified by ‘exment_pass’;』を入力して『enter』キーを押下して下さい。

step.6
『FLUSH PRIVILEGES;』を入力して『enter』キーを押下して下さい。

step.7
『\q』を入力して『enter』キーを押下して下さい。

※ファイアウォールの設定もして下さい。
もし、ファイアウォールの設定が分からない場合は、MySQLのインストール手順を参照して下さい。![]()
step.8
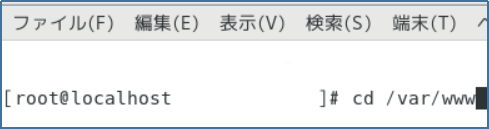
インストールするフォルダーへ移動して下さい。
コマンドは『cd /var/www』です。
今回は、『/var/www』にインストールしますが、適宜自分の環境に合わせて読み進めて下さい。
step.9
wgetを使用してExmentをダウンロードして下さい。
コマンドは『wget https://exment.net/downloads/ja/exment.zip』です。

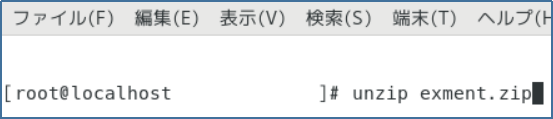
step.10
ダウンロードしたzipファイルを解凍して下さい。
コマンドは『unzip exment.zip』です。
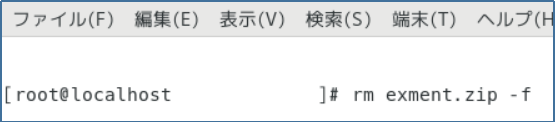
step.11
ダウンロードしたファイルを削除して下さい。
コマンドは『rm -f exment.zip 』です。
step.12
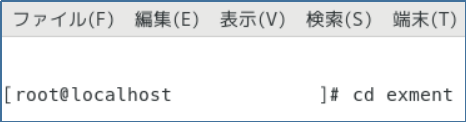
『exment』フォルダーへ移動して下さい。
コマンドは『cd exment』です。
step.13
ファイルとフォルダーの所有者の変更して下さい。
コマンドは『chown apache:apache -R /var/www/exment』と
『chown apache:apache -R /var/www/exment/.env』です。


step.14
ファイル・フォルダーの権限の変更をして下さい。
コマンドは『chmod 775 /var/www/exment』と
『chmod 775 -R /var/www/exment/storage』と
『chmod 775 -R /var/www/exment/bootstrap/cache』と
『chmod 775 -R /var/www/exment/app』と
『chmod 775 -R /var/www/exment/config』と
『chmod 775 -R /var/www/exment/public』です。


step.15
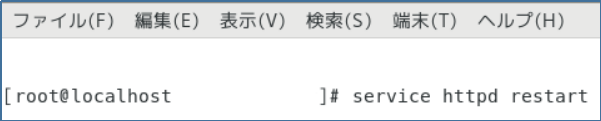
Apacheを再起動して下さい。
コマンドは『service httpd restart』です。
step.16
PC(Server)のchromeなどのブラウザのURLにhttp://localhost/adminを入力して下さい。
step.17
『Language』画面で、下記内容を設定し『次へ』ボタンを押下して下さい。
Language → 日本語を選択
TimeZone → (GMT +9:00)日本

step.18
『データベース設定』で下記内容を入力して『次へ』ボタンを押下して下さい。
データベース種類 → MySQL
データベースのホスト名 → 127.0.0.1
データベースのポート番号 → 3306
Exment用データベース名 → exment_database
Exment用データベースのユーザー名 → exment_user
Exment用データベースのパスワード → exment_pass

step.19
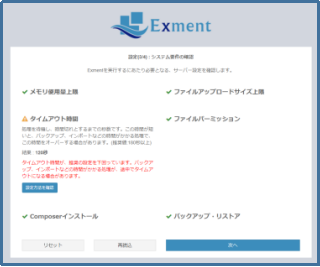
『システム要件の確認』が表示されるので『次へ』ボタンを押下して下さい。
step.20
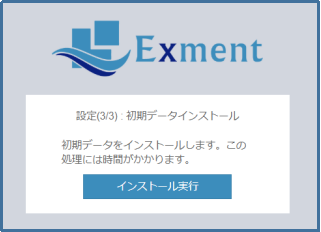
『初期データインストール』が表示されるので『インストール実行』ボタンを押下して下さい。
step.21
再度、chromeなどのブラウザのURLにhttp://localhost/adminを入力して下さい。
step.22
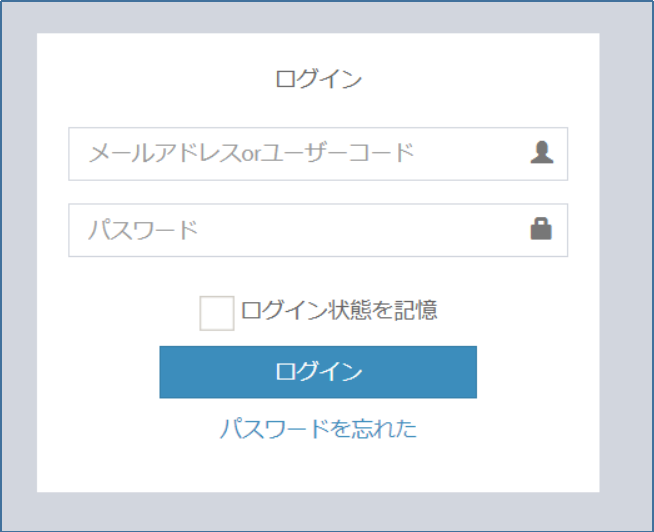
『ログイン』画面が表示されるので、下記の値を入力してログインして下さい。
メールアドレスorユーザーコード → exment_admin
パスワード → exment_pass
step.23
Exmentのメニュー画面が表示されれば完了です。
Complete!!
お疲れ様でした。
これで晴れてExmentのインストール及び環境設定は完了です。
ナマケモノ君。出来たかな?
はい!。出来ました。
ふくろう先生、ありがとうございました。
最後に私からの宣伝
コーポレートサイトhttps://www.rin-tech.netを開設しました。
どうぞ、よろしくお願いいたします。
自分達でシステム構築できそうですか?
『専任の担当者がいないから無理かなぁ』
『担当者に構築する時間がないからなぁ』
『一人でやりきる自信がない』
『導入・構築までやってくれないかなぁ』
と色々と思う方もいたのではないでしょうか?
そんな方に朗報です。
御社が望む環境をお伝え頂き
環境構築・システム構築のお手伝いをさせて頂きます。
別途、メニューを設けておりますので、興味を持たれた方は
見積り希望と明記のうえお問い合わせ下さい。
連絡お待ちしております。
※無理な場合もありますので、その際にはご理解の程宜しくお願い致します。
日々の業務を行いながら
『私の業務って他の会社さんでもあるよなぁ』
『この仕事って同じ業種の会社でも似たようなことしているよなぁ』
『この仕事って同じ職種でも似たようなことしているよなぁ』
『この部分だけでもシステム化出来ればいいなぁ』
『KintoneやJUST.DB、UnitBaseを利用したいけど、相当お金かかるよなぁ』
『今話題のノーコードツールで業務を効率化したいなぁ』
と色々と感じる方もいるのではないでしょうか?
そんな方に朗報です。
私とあなたでタッグを組みませんか?
やることは簡単!
あなたが日々行っている業務を見せて頂き、私が紐解き分解します。
そのうえで、DevOptのシステム開発手法を使い設計・開発していきます。
そうして完成したシステムで他社さんのお悩みを解決しませんか?
もし、興味を持たれた方はお問い合わせ下さい。
連絡お待ちしております![]()
※無理な場合もありますので、その際にはご理解の程宜しくお願い致します。
多くの運送会社で使用する可能性が高い情報共有ツールDriveShield.を作成しました。
DriveShield.とは、『ドライバーさんを守る!』という意味を込めて命名しました。
どうぞ、よろしくお願いいたします。
多くの企業の総務などで必要性が高い情報共有ツールWorkWave.を作成しました。
WorkWave.とは、『仕事の波を乗りこなせ!』という意味を込めて命名しました。
どうぞ、よろしくお願いいたします。


コメント