
LinuxのCentOS7のインストールする方法ってどうやるのかな?
設定方法も分からないや。
そうだ!ふくろう先生に聞いてみよう。
ふくろう先生。こんにちは。
CentOS7をインストールする方法ってどうやればいいですか?
設定方法も分からないので教えて下さい。
ナマケモノ君。こんにちは!
今回は、CentOS7をインストール方法と環境設定だね。
わかったよ。
次の手順に従っていけば、出来るよ。
今回の最終目標
- 用意したPC(Server)にCentOS7のインストールを完了させて標準的な設定を行います。
※今回は、敢えてVM環境やDockerを使用せずにインストールしています。
用意するもの
- 8GB以上のUSBメモリを1本。
- Win32DiskImagerがインストールされたPCを1台。
- CentOS7 をインストールするPC(Server)を1台。
概要
- CentOS7 をダウンロードします。
- ダウンロードしたCentOS7 のイメージファイル(iso)をUSBメモリへ書き込みます。
- PC(Server)にCentOS7 をインストールします。
- インストールしたCentOS7 の初期設定を行います。
作業手順
Win32DiskImgerのインストールが、まだの方はこちらを参照して下さい。
step.1
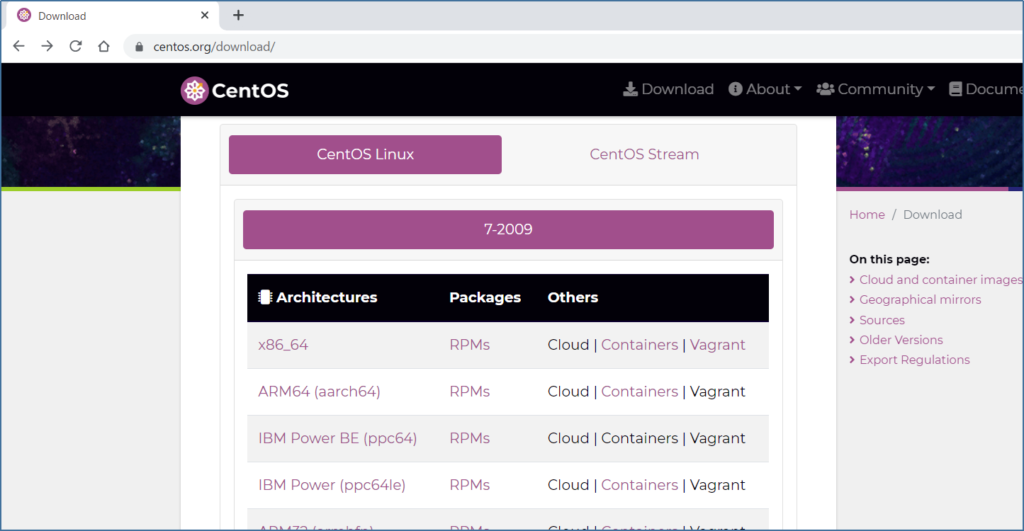
CentOSサイトへ移動して下さい。

step.2
任意のパッケージを選択して下さい。今回 私は『x86_64』を選択します。
step.3
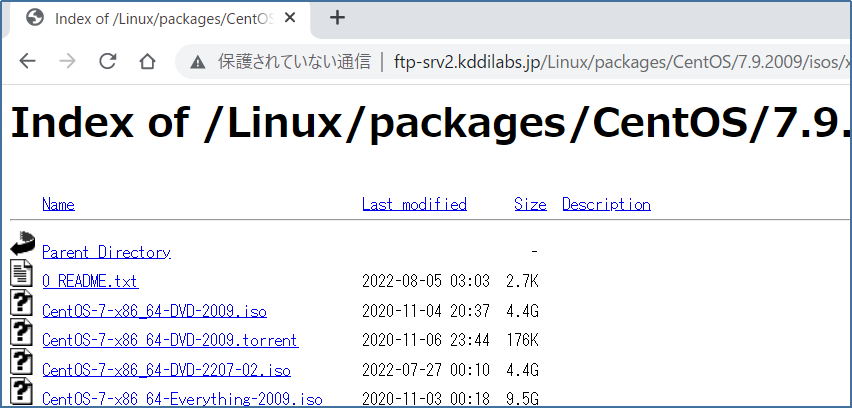
ダウンロードサイトが複数表示されるので任意のサイトを選択して下さい。
今回 私は『http://ftp-srv2.kddilabs.jp/Linux/packages/CentOS/7.9.2009/isos/x86_64』を選択します。

step.4
数種類のCentOSのバージョン7.9が表示されるので、任意のisoを選択して下さい。
今回 私は『CentOS-7-x86_64-DVD-2009.iso』を選択しました。
step.5
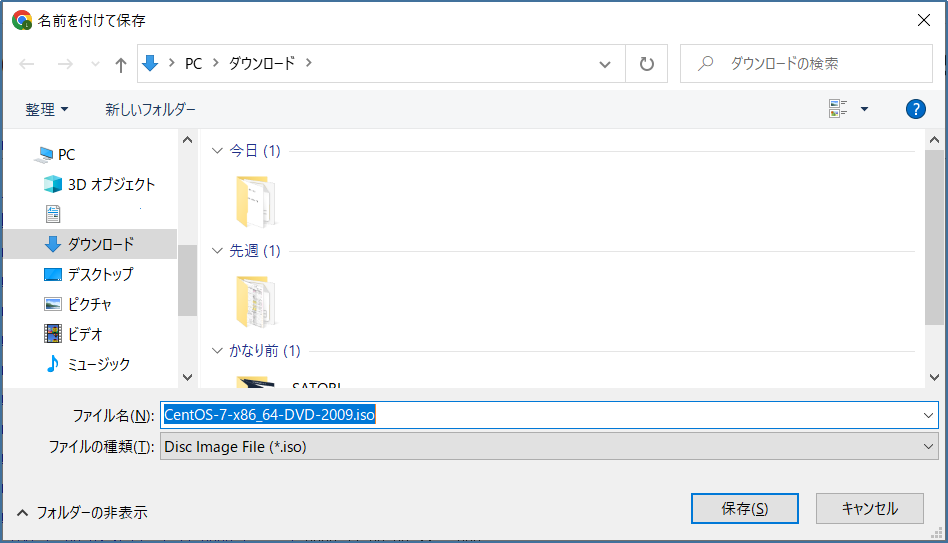
ダウンロード先を聞いて来るので、任意のフォルダーを指定してダウンロード開始して下さい。
step.6
ダウンロード完了後に、『win32diskimager』をインストールしたPCにUSBを差し込んで下さい。
step.7
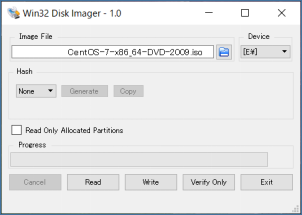
先程、インストールした『win32diskimager』のアイコンをダブルクリックして下さい。
step.8
Image File欄に先程ダウンロードした『CentOS-7-x86_64-DVD-2009.iso』をセット後、『Write』ボタンを押下して下さい。
step.9
USBに書き込んで良いか聞いてくるので『Yes』ボタンを押下して下さい。

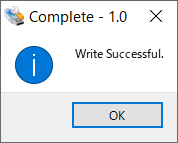
step.10
書き込みが完了すると、下記ダイアログが表示されるので『OK』ボタンを押下して下さい。
step.11
インストールするPC(Server)のBIOSでディスク等の読み込み順を変更して、USBメモリの優先順位を上げて下さい。
※読み込み順の変更は、メーカーやモデルにより違いますので一度公式サイトで確認して下さい。
step.12
CentOSをインストールするPC(Server)にUSBを差し込み、『電源ボタンON』にして下さい。
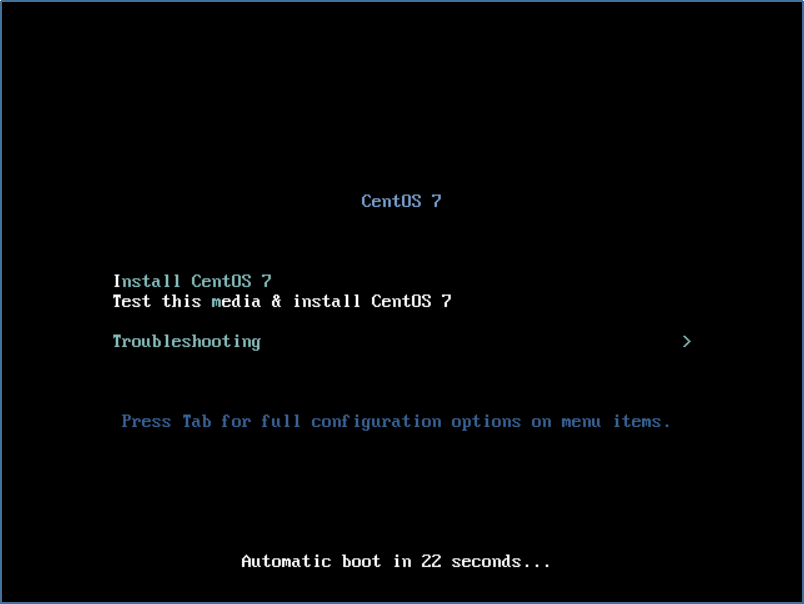
step.13
下記画面が表示されるので『Install CentOS 7』を選択して『enter』ボタンを押下して下さい。
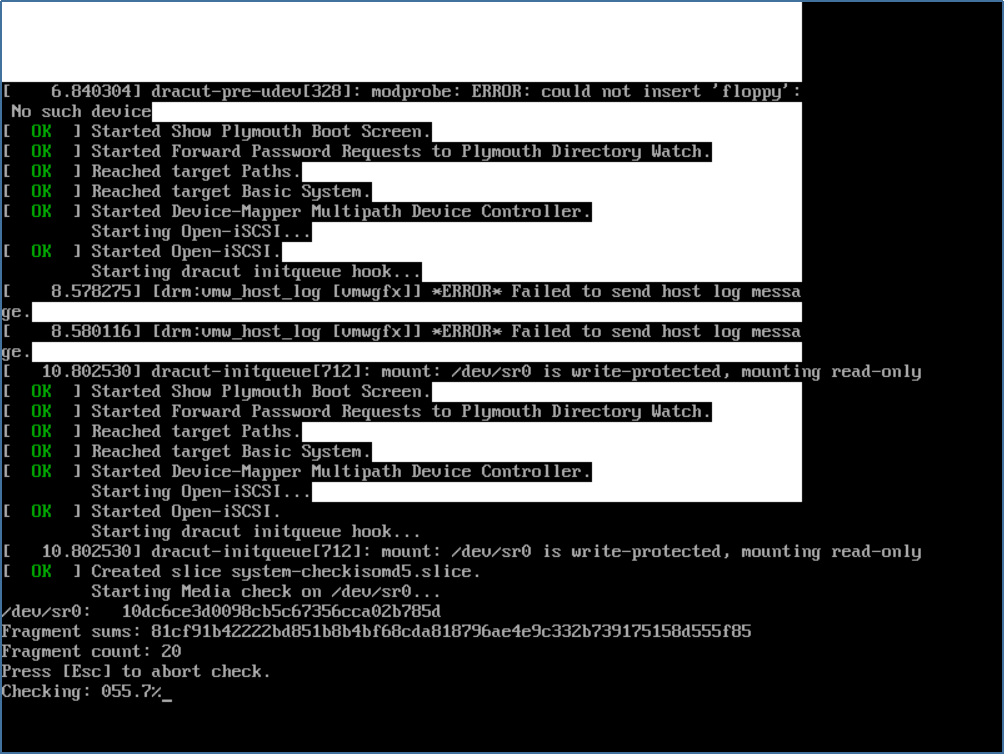
step.14
途中、下記画面になってもそのまま放置しても大丈夫です。または、『ESC』キーを押下して先に進める事も出来ます。
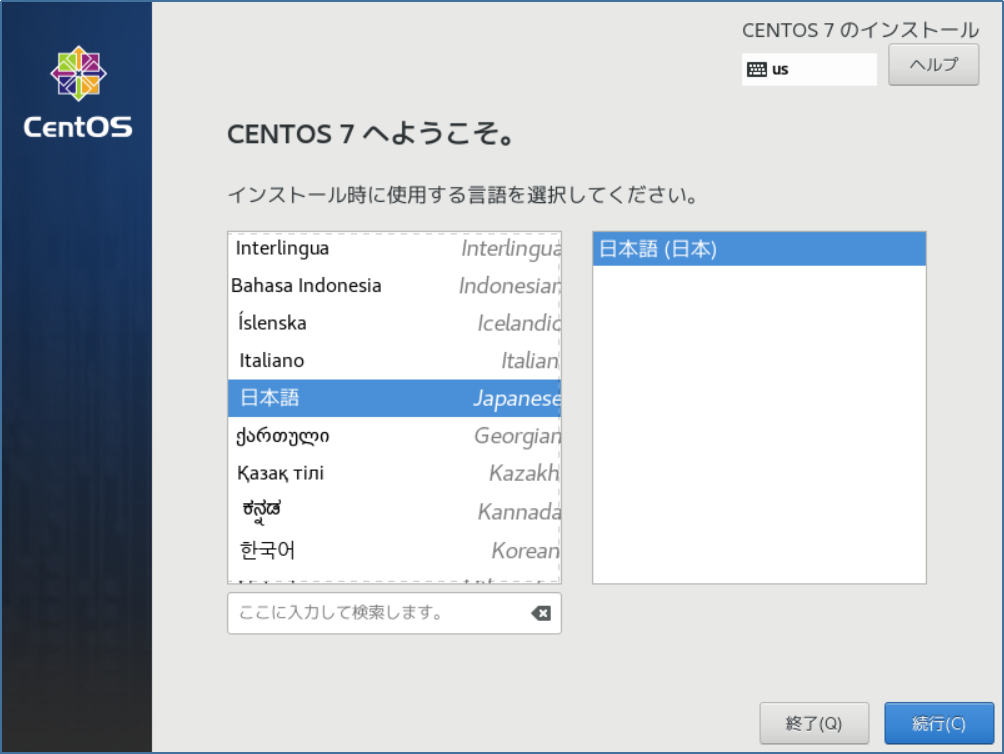
step.15
『CENTOS7へようこそ』画面で『日本語』を選択して『続行』ボタンを押下して下さい。
step.16
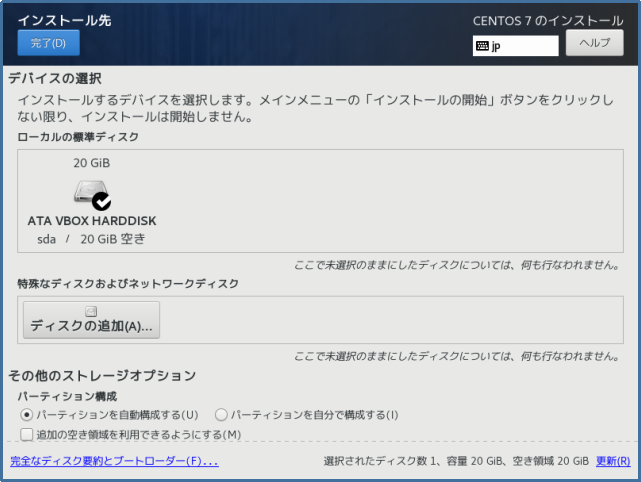
『インストールの概要』画面で『インストール先』を押下して下さい。
step.17
『インストール先』画面で『ローカル標準ディスク』を選択し、『完了』ボタンを押下して下さい。
step.18
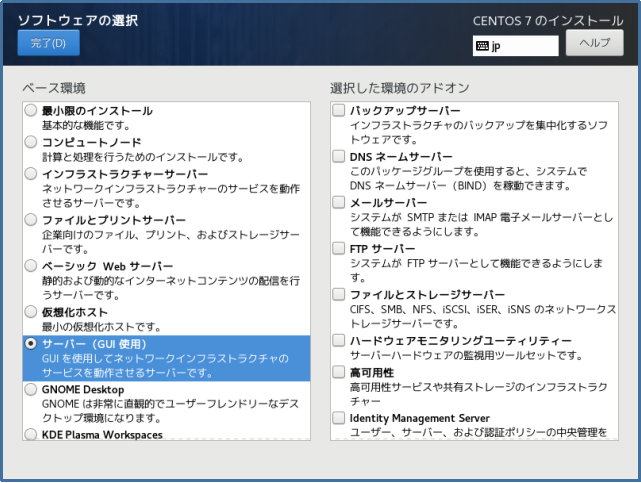
再度表示される『インストールの概要』画面で『ソフトウェアの選択』を押下して下さい。
step.19
『ソフトウェアの選択』画面で『サーバー(GUI使用)』を選択し『完了』ボタンを押下して下さい。
step.20
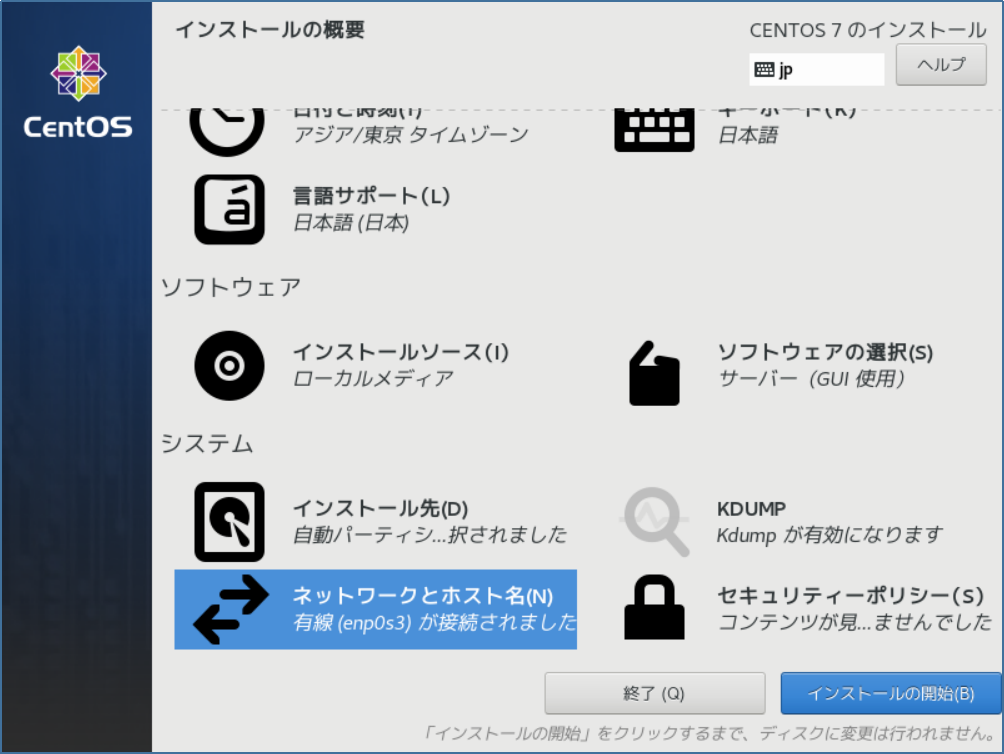
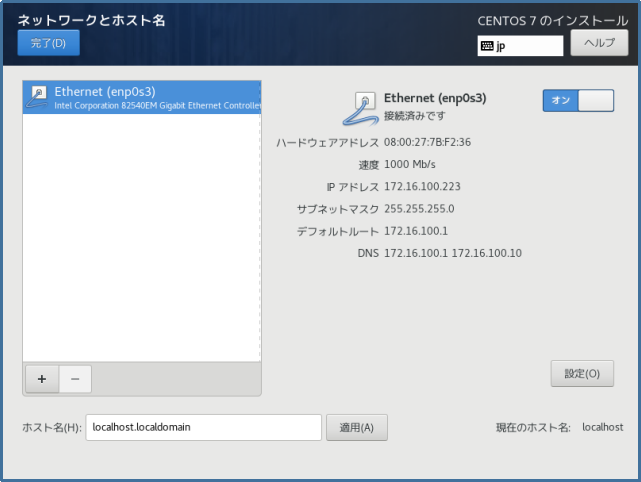
再度表示される『インストールの概要』画面で『ネットワークとホスト名』を押下して下さい。
step.21
『ネットワークとホスト名』画面で『Ethernet(xxxxx)』を『オン』に切り替えて下さい。
※IPアドレスの設定をDHCPのままでよいか、固定のIPアドレスを設定するかは、御社のネットワーク管理者等に確認して下さい。
step.22
再度表示される『インストールの概要』画面で『インストールの開始』ボタンを押下して下さい。
step.23
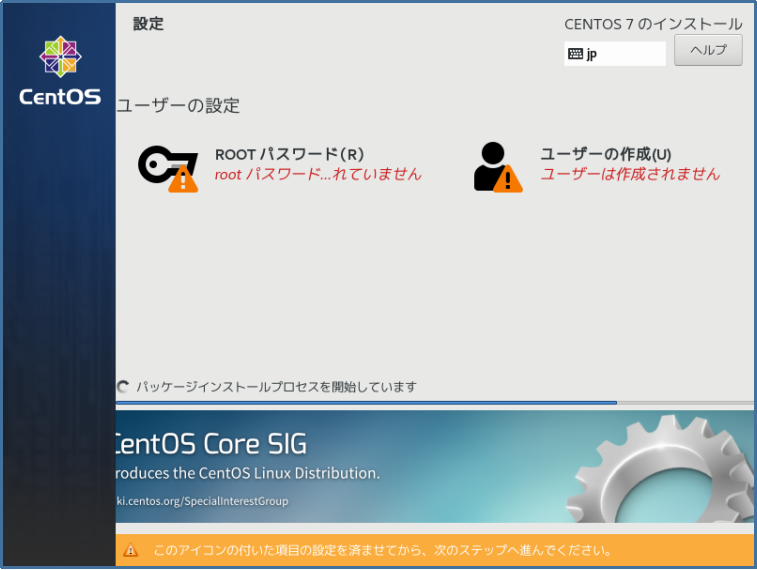
『設定』画面が表示されるので『ROOTパスワード』を押下して下さい。
step.24
『ROOTパスワード』画面で『rootパスワード』欄と『確認』欄を入力後『完了』ボタンを押下して下さい。

step.25
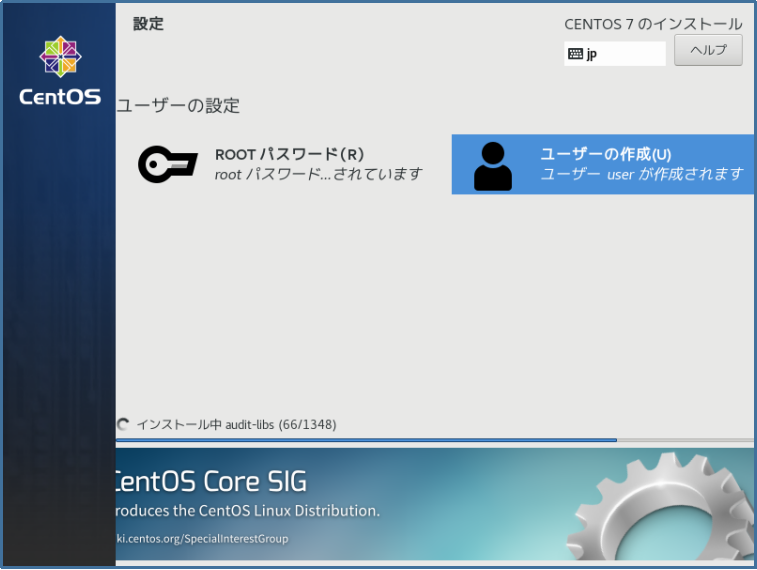
再度表示される『設定』画面で『ユーザーの作成』を押下して下さい。
step.26
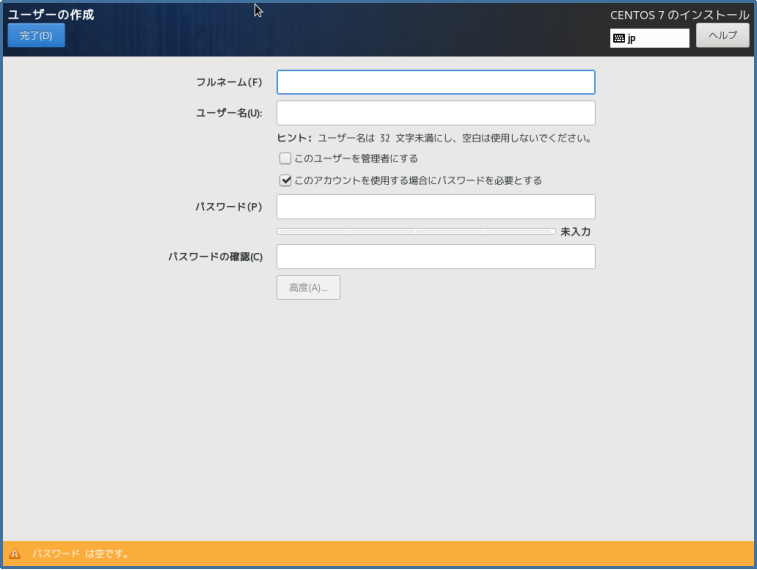
『ユーザーの作成』画面で各項目を入力後、『完了』ボタンを押下して下さい。
step.27
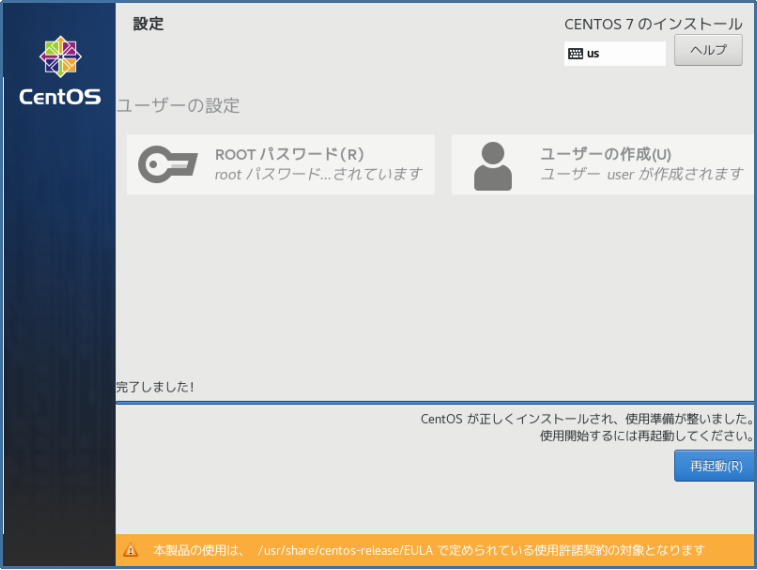
再度表示される『設定』画面は、そのまま放置して下さい。
step.28
インストールが完了すると『再起動』ボタンが表示されるので押下して下さい。
step.29
再起動後、表示される『初期セットアップ』画面で『License Information』を押下して下さい。
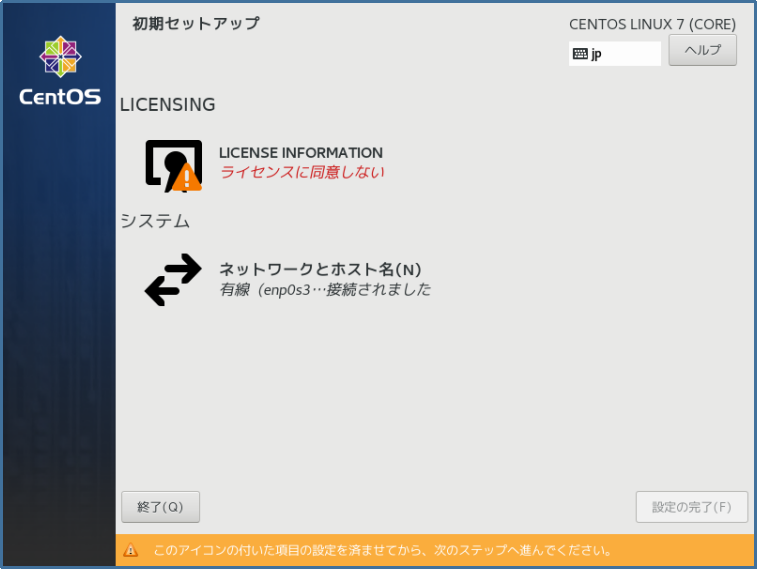
step.30
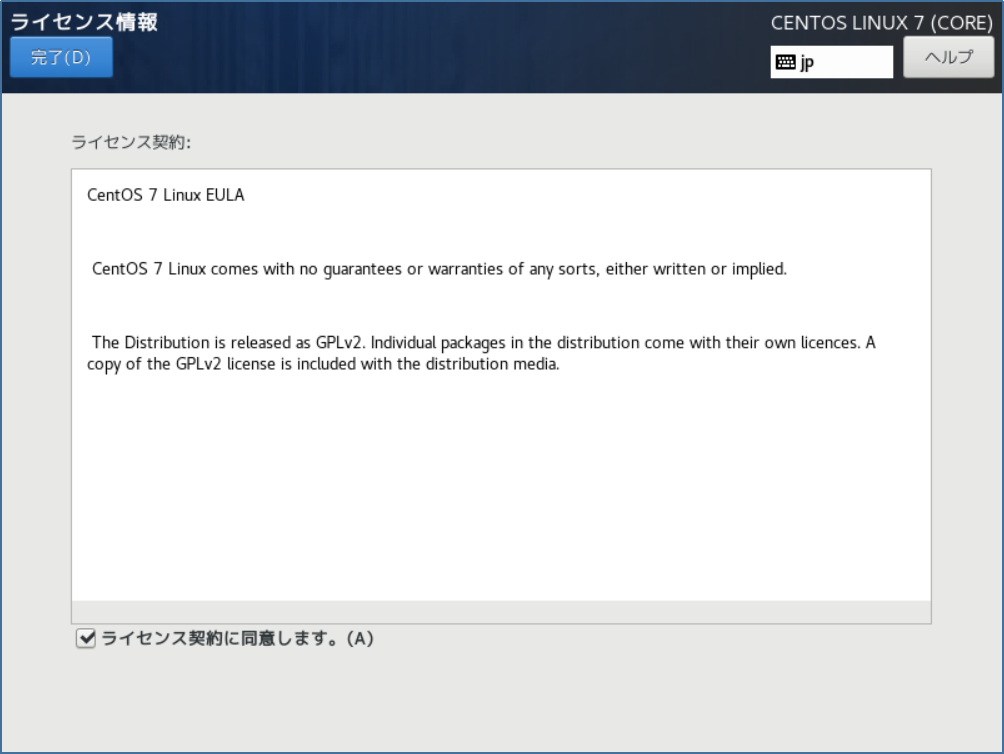
『ライセンス情報』画面で『ライセンス規約に同意します』にチェックを入れて『完了』ボタンを押下して下さい。
step.31
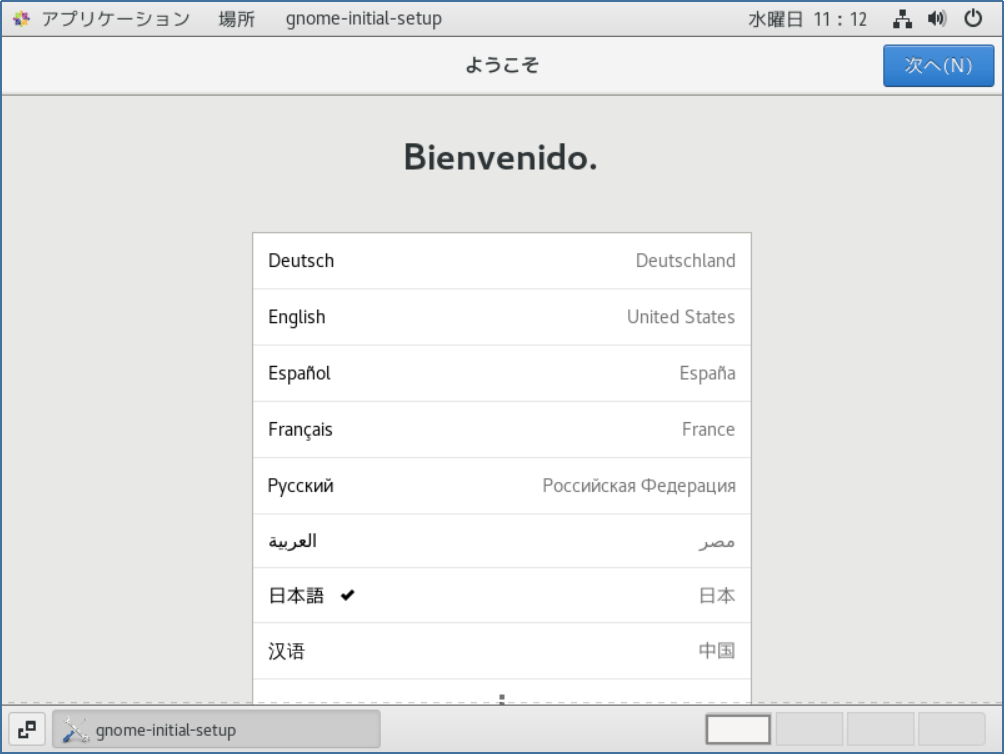
『ようこそ』画面で『日本語』にチェックを入れ『次へ』ボタンを押下して下さい。
step.32
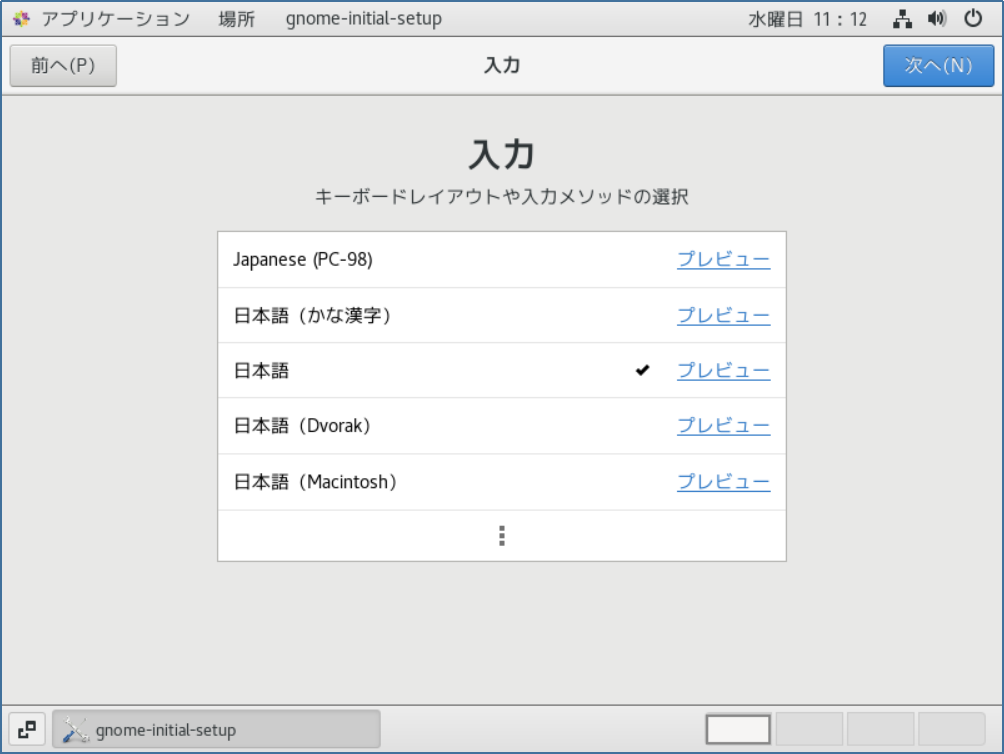
『入力』画面で『日本語』にチェックを入れ『次へ』ボタンを押下して下さい。
step.33
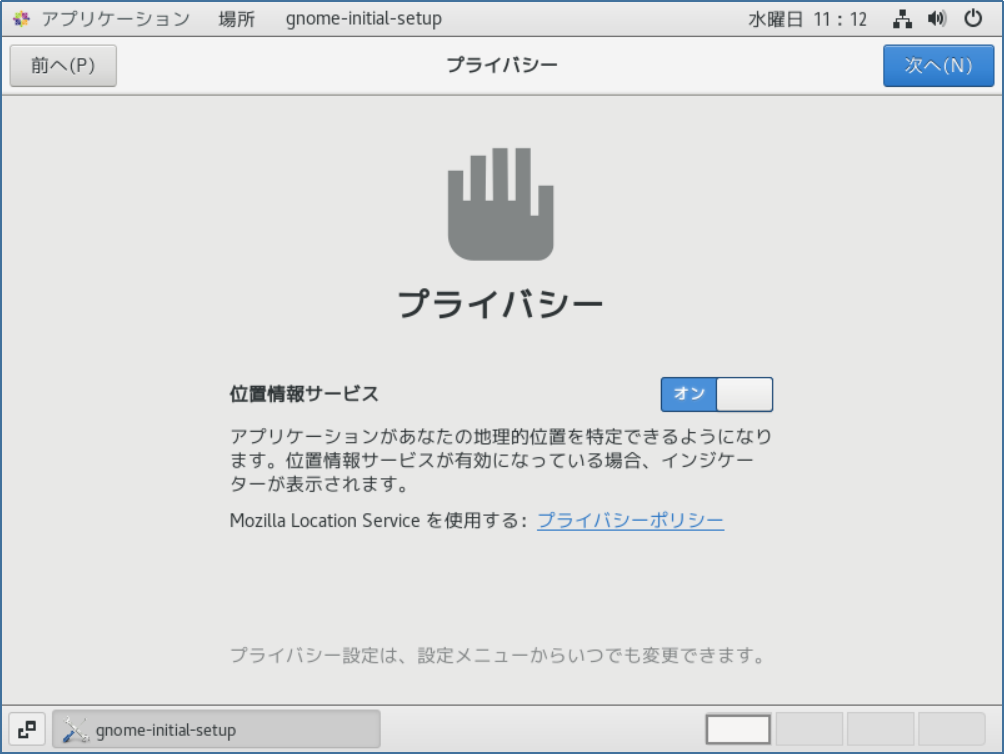
『プライバシー』画面で『位置情報サービス』をオフにして『次へ』ボタンを押下して下さい。
※オンでも問題ないです。
step.34
『オンラインアカウント』画面で『スキップ』ボタンを押下して下さい。

step.35
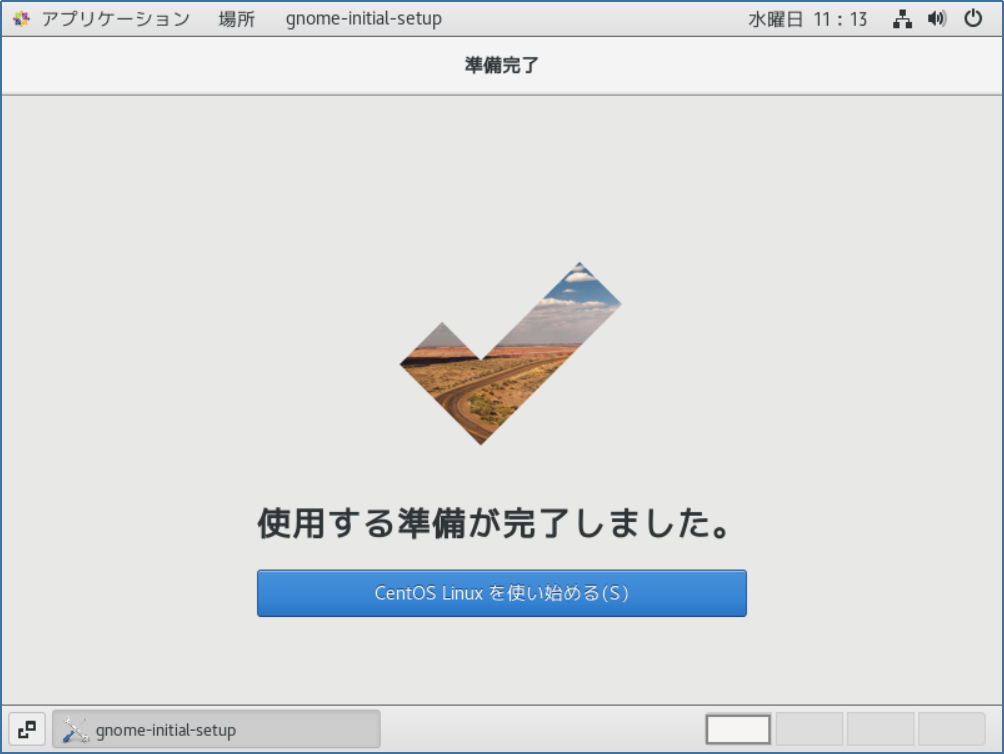
『準備完了』画面で『CentOS Linuxを使い始める』ボタンを押下して下さい。
Complete!!
お疲れ様でした。
これで晴れてCentOSのインストール及び環境設定は完了です。
ナマケモノ君。出来たかな?
はい!。出来ました。
ふくろう先生、ありがとうございました。
コーポレートサイトhttps://www.rin-tech.netを開設しました。
どうぞ、よろしくお願いいたします。
コメント